 Rahul Khadse

The Virtual private network VPN technology included in Windows server 2008 helps enable cost -effective , secure remote access to private networks . VPN allows administrator's to take advantage of the internet to help provide the functionality and security of private WAN connection's at a lower cost . In windows server 2008 , VPN is enabled using the routing and remote access service . VPN is part of a comprehensive network access solution that includes support for authentication and authorization services , and advanced network security technologies . There are two main strategies that help to provide secure connectivity b/w private networks and enabling network access for remote users.
Dial - up or leased line connections
A dial -up or leased up line connection creates a physical connection to a port on a remote access server on a private network. However, using dial-up or leased lines to provied network accessis expensive when compared to the cost of providing to the network access using a VPN connection .
VPN CONNECTION
VPN connections use either point - to -point Tunneling Protocol (PPTP) or layer two tunneling protocol /internet Protocol Security (L2TP/IPSec) over an intermediate network , such as the internet . By using the internet as a connection medium , VPN saves the cost of long-distance phone service and hardware costs associated with using dial - up or leased line connections .Vpn solution includes advanced security technologies such as data encryption , Authentication, Authorization and network access quarantine control .
NOTE SOMEPOINTS ABOUT VPN ==>
- To translate address
- VPN two types 1st -- Side to side VPN & 2nd -- Remote access VPN .
- PPTP creates a tunnel & Encrypt data.
- Layer 2 tunnel protocol is developed by cisco & microsoft.
- SSTP is a new feature in 2008 .
- It will issue all certificates while we use internet explorer to office.
- Network Access policy should be installed.
- Dial up permission to user.
1> Start /Administrative Tools / Server Manger.

2> Right click on your local server and select add roles .

3> Read instructions and click next.

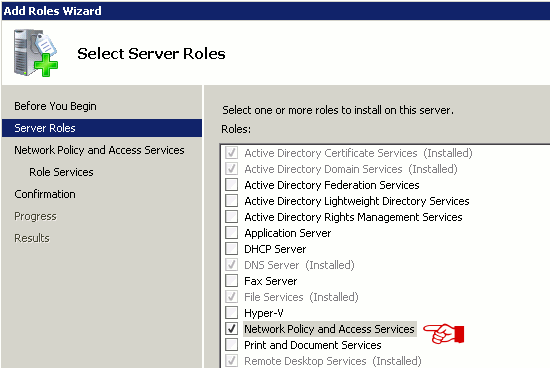
4> Select Network Policy And Access Services & click next
5> On the third screen titled "Network Policy and Access Services" read what is started and click next to continue
6> On the following screen titled "select role services" place a check mark on "Routing & Remote Access Services" and make sure "Remote Access Services" are selected as well. Now click on next button.

7> Next, on the screen titled "Confirm Installation Selection" You will get summary of everything that will be installed . Make sure everything looks good and click on install button. Once the installation finish click "close" to end the wizard. Back on the main server manager window, right click on "Configure and Enable Routing & Remote Access".

8> This will bring up the "Routing & Remote Access Wizard". On the first window click next .
9>On the second page "Custom Configuration" & hit next.

10>Next, Place a check mark on "VPN Access" & click "next".

11> On the last page wizard , click "finish" and then select "start services" on the following window that will pop up
12>Once the process is finished & you are back on the main server manager windows, routing & remote access should now be up and running.

13> Give domain users access to VPN If you are on a domain , go to your domain server , click on "start"/ All programs/ Administrative Tools /Active Directory Users & Computers.
14> On the left hand side column, look for your domain users. Domain click on the user you want to give access to . This will bring up the properties for that user. Click on "Dial-In" tab and under "Network Access Permission select "allow access". Click "apply" and "OK" to finish.

Repeat the same operation for all users on your network you want to give VAN access.And that is it.
Soo to access user in client computer (window 7)
- Start/Control Panel/Network Sharing Center/Select set up a new connection or network.
- Choice last option set up dial-up/Connect to workplace.
- Type address & IP
- Now give username & password & type domain & create .
- Virtual LAN icon will display.
- Click on it write your username ,password & domain name and connect it.
 Posted in: MCITP


