Showing posts with label MCITP. Show all posts

Monday, March 26, 2012

Hyper-V ,Installation & configuration

The Hyper V roles enables you to create a virtual server computing environment using a technologies that is a part of window server 2008 x64 bit. You can use a visualize computing environment into improve the efficiency of your computer resources by utilizing more of your hardware resources. 


                                Hardware Requirements
  1. Hyper V Supported X64 based computer system.
  2. 100 Mbps lancard.
  3. Free hardisk space according to your reqirements.
  4. Separate storage area .
  5. Hardware assistant virtuallisation .
  6. Hardware data execution protection.
  7. Microsoft Window Server 2008 X64 bit.
  8. Hyper V must be installed.
  9.  You should have administrative rights & should have good knowledge of virtualization.
                               Steps To Install Hyper-V               
 Note One Thing Before Installing Hyper - V ==> You should enable CPU Virtualization Mode and Exicute Disable bit. To enable it restart your computer press your booting key for net bios setting F2 or Del Whatever according to your operating system. Open botting /advance / CPU Configuration Secure Virtual Machine Mode / Enable it .


 1> Go to Start / Administrative Tools / Server Manager / Right click on roles and select add roles.


2> Now Read the instruction carefully and click on next.
3> In the server roles check the check box of hyper -V and hit next button. 


4> Click next on Introduction page as given in below picture.


5> Select all the network interface card  (NIC) that you wish to assign for a vertual machine (eg - You can take your any lan card eg :-public)


6> In the confirmation section click install button.


7> After installation finished you have to close and click on yes to reboot your computer.


8> After rebooting your computer it will automatically open server manger and resume the installation process 


9> After about a minute, you should see a message telling you that hyper-V has installed successfully. click "close" to complete the wizard. 


10> Using the servermanagercmd.exe is easy , and required three word's ..... A reboot is required at the end of the installation (which can be also added to the command , making it 4 words....) However Hyper-V network connection will need to be changed after installation.
# Open the command prompt with elevated permission means (right click on your command prompt and select run as administrator) as in give below picture.


# Type : servermanagercmd -i Hyper V . If you want to automatically reboot the server when the installation finished , type : servermanager -i Hyper-V-restart
                                              How To Configure Virtual Machine
  1. Open hyper-V Manger from the administrative tools.
  2. Before doing this create a folder in any NTFS disk with the name hyper -V.
  3. Now right click on your local server & select new / point to new virtual machine.
  4. Click next / Sutable Name to the virtual machine / select checkbox store the virtual machine in a different location select browse & give path of your file.
  5. Click next / now give 1gb  (1000mb) & click next.
  6. Select connection as public virtual network / next.
  7. Now it will ask for to give size 27gb / next.
  8. Now double click on your local server and in the center pannel select it now select action / start .
  9. Now install it .
NOTE : - ALT + CTRL + LEFT KEY  ==> Out Side Arrow (when you click on VM)
                 ALT + CTRL + RIGHT KEY ==> For Inside Arrow 


Watch this video given below installation+ configuration for hyper -V
Need more overview download this Microsoft overview about hyper-V click here

Sunday, March 25, 2012

VAN (Virtual Private Network) , installation , configuring & Configuring server user in client computer (win 7)


The Virtual private network VPN technology included in Windows server 2008 helps enable cost -effective , secure remote access to private networks . VPN allows administrator's to take advantage of the internet to help provide the functionality and security of private WAN connection's at a lower cost . In windows server 2008 , VPN is enabled using the routing and remote access service . VPN is part of a comprehensive network access solution that includes support for authentication and authorization services , and advanced network security technologies . There are two main strategies that help to provide secure connectivity b/w private networks and enabling network access for remote users.
               
                                         Dial - up  or leased line connections
A dial -up or leased up line connection creates a physical connection to a port on a remote access server on a private network. However, using dial-up or leased lines to provied network accessis expensive when compared to the cost of providing to the network access using a VPN connection .
                                                     VPN CONNECTION 
VPN connections use either point - to -point Tunneling Protocol (PPTP) or layer two tunneling protocol /internet Protocol Security (L2TP/IPSec) over an intermediate network , such as the internet . By using the internet as a connection medium , VPN saves the cost of long-distance phone service and hardware costs associated with using dial - up or leased line connections .Vpn solution includes advanced security technologies such as data encryption , Authentication, Authorization and network access quarantine control .


NOTE SOMEPOINTS ABOUT VPN ==>
  1. To translate address 
  2. VPN two types 1st -- Side to side VPN  & 2nd -- Remote access VPN .
  3. PPTP creates a tunnel & Encrypt data.
  4. Layer 2 tunnel protocol is developed by cisco & microsoft.
                        WHAT IS NEW IN VAN ?
  1. SSTP is a new feature in 2008 .
  2. It will issue all certificates while we use internet explorer to office.
  3. Network Access policy should be installed.
  4. Dial up  permission to user.                          
                                 Install All VPN Related Services

1> Start /Administrative Tools / Server Manger.                                                                              


2> Right click on your local server and select add roles .


3> Read instructions and click next.


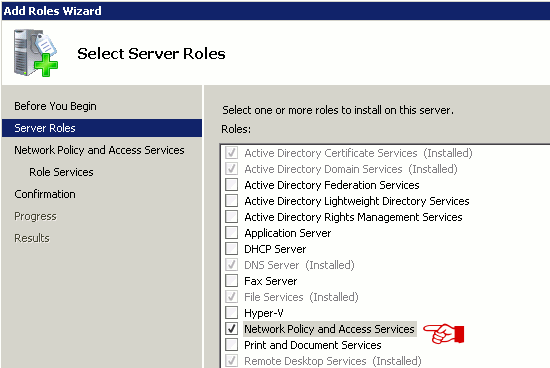
4> Select Network Policy And Access Services & click next


5> On the third screen titled "Network Policy and Access Services" read what is started and click next to continue 
6> On the following screen titled "select role services" place a check mark on "Routing  & Remote Access Services" and make sure "Remote Access Services" are selected as well. Now click on next button.


7> Next, on the screen titled "Confirm Installation Selection" You will get summary of everything that will be installed . Make sure everything looks good and click on install button. Once the installation finish click "close" to end the wizard. Back on the main server manager window, right click on "Configure and Enable Routing & Remote Access".


8> This will bring up the "Routing & Remote Access Wizard". On the first window click next .
9>On the second page "Custom Configuration" & hit next.


10>Next, Place a check mark on "VPN Access" & click "next".


11> On the last page wizard , click "finish" and then select "start services" on the following window that will pop up 
12>Once the process is finished & you are back on the main server manager windows, routing & remote access should now be up and running. 


13> Give domain users access  to VPN If you are on a domain , go to your domain server , click on "start"/ All programs/ Administrative Tools /Active Directory Users & Computers.
14> On the left hand side column, look for your domain users. Domain click on the user you want to give access to . This will bring up the properties for that user. Click on "Dial-In" tab and under "Network Access Permission select "allow access". Click "apply" and "OK" to finish.


Repeat the same operation for all users on your network you want to give VAN access.And that is it.
                       Soo to access user in client computer (window 7)
  1. Start/Control Panel/Network Sharing Center/Select set up a new connection or network.
  2. Choice last option set up dial-up/Connect to workplace.
  3. Type  address & IP
  4. Now give username & password & type domain & create .
  5. Virtual LAN icon will display.
  6. Click on it write your username ,password & domain name and connect it.

Tuesday, March 20, 2012

NAT (Network Address Translation) , requirements, installation in window server 2008


                                                             What Is NAT 
NAT stands for Network Address Trans later or Translation .It is a feature of Microsoft 2000,2003 & 2008 . And is available in the routing & remote access services NAT is used to connect your private area network with the public area network vice versa.


                                Why NAT Is Required ?

  1. It will connect your LAN with WAN .
  2. It  will hide your private area network & connect with internet.
  3. NAT is used to stop the wastage of public IP address.
  4. NAT is used to share the internet connection with other user.
  5. Software NAT reduce the high cost of router's.
                                 REQUIREMENT TO NAT
  1. Routing & remote services must be installed.
  2. Public & private ip address.
  3. Administrative rights & window server 2008
                                HOW TO CONFIGURE NAT

  1. Open Routing & Remote Access Services from administrative tools.
  2. Right click on your local server & select option configure routing & remote access.
  3. On the welcome page click next.
  4. On the second page (NAT) Network Address Translation.
  5. Select a public interface & click next and finish
Installing and Configuring NAT Server on Server 2003 / 2008

Installing and Configuring NAT Server on Server 2003 / 2008

In this post I will explore Network Address Translation (NAT) and then go ahead and Install NAT on my Server 2003 machine and check how its working on my Windows XP machine. 


                                           What is NAT and how it works? 
before installing NAT, lets take a closer look at what is NAT and what it actually does. Here's an example. You have a computer at home and you need an internet connection, so you call up or visit your local Internet Service Provider (ISP) ; yes I am talking about the company who gives out internet connections or more simply, Internet. You discuss and agree upon a monthly fee and the ISP will install a cable and depending upon the technology your ISP uses, they may install a Cable or DSL Modem. The modem gives out an Ethernet connection that hooks on to your computers RJ45 Ethernet Jack. If you are living in a remote area, you might have to dial-in to your ISP's network using a Public Switched Telephone Network (PSTN) or more simply, your telephone line. So now you have an internet connection and you are ready to conquer the web. But did you know that every computer connected to the internet has an IP Address associated to it, which is to make sure that no computer receives information intended for another computer. And sadly, there were only about 4 billion IP addresses that could be give out and about 95% of them have already been given out as I write this information. Apparently it is, thus, very expensive to obtain an IP address on the internet. The addressing scheme / technology used on the internet currently is IPv4. IPv6, the new addressing technology with several enhancements including a virtually unlimited supply of addresses is relatively new but will gain substaintial importance in years to come.


                       Not diverging more from our topic we must only understand for now that due to this dire shortage of IP addresses on the Internet a technology was invented that allowed several computers to share a single IP address. The drawback, a server computer needs to be configured with NAT and all other computers will connect to the internet through this server computer. 


                          The NAT server essentially serves as a gateway between local computers and Internet and it has two Network connections, one connecting it to local computers and the other connecting it to the internet. It receives internet requests from local computers, strips off all IP addressing information and puts its own IP addressing information, sends the request over the internet. When it receives a response from the internet it examines the response and determines for which local computer the response is, strips its own IP addressing information, puts back local computer's IP addressing information and sends the response over local network to the computer. This gateway can have several other value added features such as address reservations, Web or E-mail server connections from Internet computers to local servers, strong firewall features and a few others.


                                                                       Your ISP has a NAT server that not only provides internet connectivity to all computers connected to your ISP's network (like yours) but also measure how many GigaBytes of traffic each computer produces, this information is used to charge fees from each customer every month. If you use a router / wireless router to get internet connectivity on two or more computers from a single internet line, you too are using NAT and your router is your NAT server.talling and Configuring NAT on Windows Serv
                          Some points to remember while configuring NAT.
1.    Always assign static IP addresses to your NAT server on local NIC.
2.    Always assign the default gateway address as the IP address of your NAT server for all local computers.
3.    If you have a DNS server configured on your network you must configure DNS forwarding on it. If you don't have a DNS server, you can provide IP address of your ISP's DNS server as the preferred server to all local computers.
4.    If you have a DHCP server on your network, configure it to issue default gateway and DNS server addresses according to above specifications.
Now we take an example of NAT configuration on Server 2003


Monday, March 19, 2012

Installing RRAS (Routing & Remote Access Services) , How To configure LAN routing & How to assign root


-->Routing Remote Access Services is a feature of Microsoft 2000,2003,2008 which is used to configure multiple applications in the network just like a software router NAT, VPN & Dial Up .It is a software router not a hardware router. But disadvantages are its slow & low feature.


Installation Requirements :-
  1. Window Server 2008 .
  2. Administrative Rights.  
  3. Two LAN card in computer system.
  4. Knowledge of TCP/IP routing.
  5. Private & public IP.


                                           How To Install Router Remote Access Services :-
Click Start /Administrative Tools / Server Manager


Right Click on Roles And select Add Roles


Select Skip This Page By Default and click next button

Choice Network Policy & Access Services and hit next button

Read instruction carefully and click next 

Now Select Routing & Remote Access Services check box and hit next

Click on Install button it will take a second to install

Now at last close the wizard


                      How To Configure LAN Routing After Installing RRAS

Click Start / Administrative Tools / Routing and Remote Access 

Right click On your local server and select Configure routing and server access

Now Select next button

Select last option custom Configuration and hit next

Now check the check box of LAN routing Because we are using LAN here

Now when you will click finish button it will show one tab as given above click on start service (configuration finished)

                           How To Assign Root

  1. Open Routing & remote Accessories .
  2. Expand Your IPv4 Container under the local server.
  3. Now right click on the static root & select option new static rootes.
  4. Configure your TCP/IP .
  5. Now give destination /interface /sub net/gateway IP/OK.
 NOTE :- IF problem occur go to run and type ipconfig /flushdns and retry.

Twitter Delicious Facebook Digg Stumbleupon Favorites More